SNMP
Note
This section is meant for developers that want to understand the working of the SNMP integration.
Be sure you are familiar with SNMP concepts, and you have read through the official SNMP integration docs.
Overview
While most integrations are either Python, JMX, or implemented in the Agent in Go, the SNMP integration is a bit more complex.
Here's an overview of what this integration involves:
- A Python check, responsible for:
- Collecting metrics from a specific device IP. Metrics typically come from profiles, but they can also be specified explicitly.
- Auto-discovering devices over a network. (Pending deprecation in favor of Agent auto-discovery.)
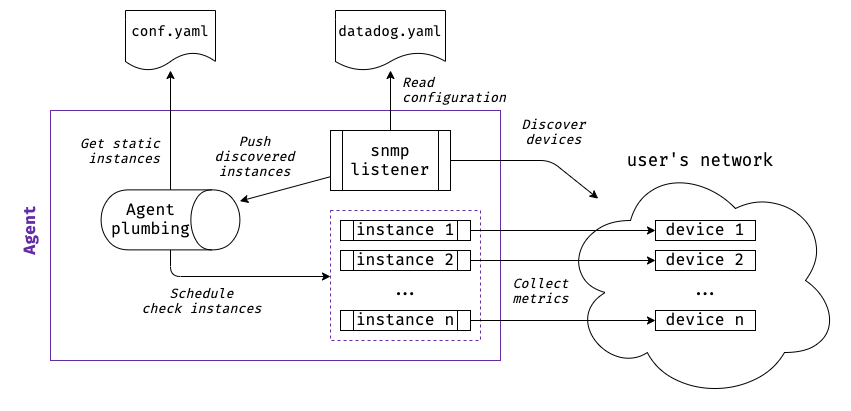
- An Agent service listener, responsible for auto-discovering devices over a network and forwarding discovered instances to the existing Agent check scheduling pipeline. Also known as "Agent SNMP auto-discovery".
The diagram below shows how these components interact for a typical VM-based setup (single Agent on a host). For Datadog Cluster Agent (DCA) deployments, see Cluster Agent support.
Python Check
Dependencies
The Python check uses PySNMP to make SNMP queries and manipulate SNMP data (OIDs, variables, and MIBs).
Device Monitoring
The primary functionality of the Python check is to collect metrics from a given device given its IP address.
As all Python checks, it supports multi-instances configuration, where each instance represents a device:
instances:
  - ip_address: "192.168.0.12"
    # <Options...>
Python Auto-Discovery
Approach
The Python check includes a multithreaded implementation of device auto-discovery. It runs on instances that use network_address instead of ip_address:
instances:
  - network_address: "192.168.0.0/28"
    # <Options...>
The main tasks performed by device auto-discovery are:
- Find new devices: For each IP in the
network_addressCIDR range, the check queries the devicesysObjectID. If the query succeeds and thesysObjectIDmatches one of the registered profiles, the device is added as a discovered instance. This logic is run at regular intervals in a separate thread. - Cache devices: To improve performance, discovered instances are cached on disk based on a hash of the instance. Since options from the
network_addressinstance are copied into discovered instances, the cache is invalidated if thenetwork_addresschanges. - Check devices: On each check run, the check runs a check on all discovered instances. This is done in parallel using a threadpool. The check waits for all sub-checks to finish.
- Handle failures: Discovered instances that fail after a configured number of times are dropped. They may be rediscovered later.
- Submit discovery-related metrics: the check submits the total number of discovered devices for a given
network_addressinstance.
Caveats
The approach described above is not ideal for several reasons:
- The check code is harder to understand since the two distinct paths ("single device" vs "entire network") live in a single integration.
- Each network instance manages several long-running threads that span well beyond the lifespan of a single check run.
- Each network check pseudo-schedules other instances, which is normally the responsibility of the Agent.
For this reason, auto-discovery was eventually implemented in the Agent as a proper service listener (see below), and users should be discouraged from using Python auto-discovery. When the deprecation period expires, we will be able to remove auto-discovery logic from the Python check, making it exclusively focused on checking single devices.
Agent Auto-Discovery
Dependencies
Agent auto-discovery uses GoSNMP to get the sysObjectID of devices in the network.
Standalone Agent
Agent auto-discovery implements the same logic than the Python auto-discovery, but as a service listener in the Agent Go package.
This approach leverages the existing Agent scheduling logic, and makes it possible to scale device auto-discovery using the Datadog Cluster Agent (see Cluster Agent support).
Pending official documentation, here is an example configuration:
# datadog.yaml

listeners:
  - name: snmp

snmp_listener:
  configs:
    - network: 10.0.0.0/28
      version: 2
      community: public
    - network: 10.0.1.0/30
      version: 3
      user: my-snmp-user
      authentication_protocol: SHA
      authentication_key: "*****"
      privacy_protocol: AES
      privacy_key: "*****"
      ignored_ip_addresses:
        - 10.0.1.0
        - 10.0.1.1
Cluster Agent Support
For Kubernetes environments, the Cluster Agent can be configured to use the SNMP Agent auto-discovery (via snmp listener) logic as a source of Cluster checks.
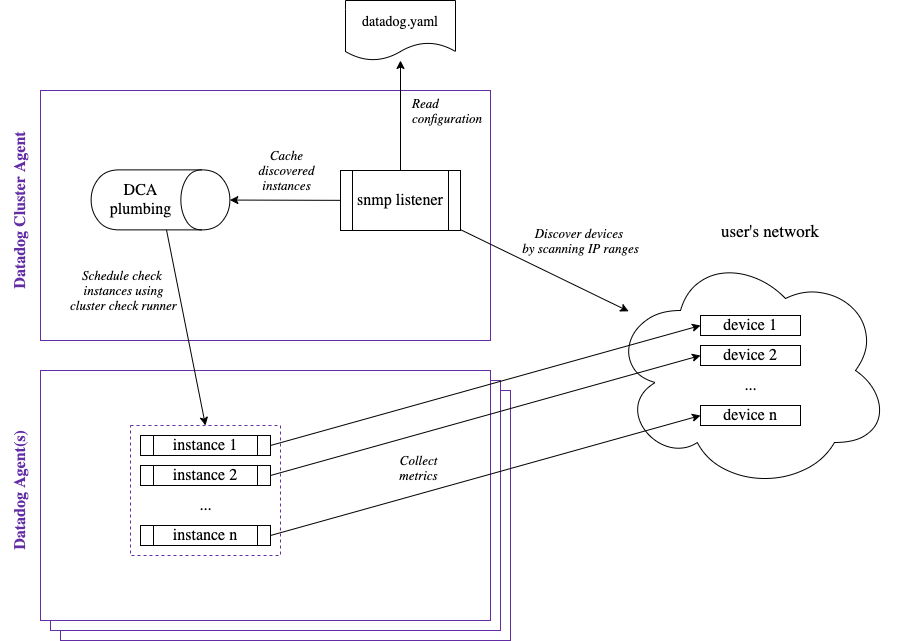
The Datadog Cluster Agent (DCA) uses the snmp_listener config (Agent auto-discovery) to listen for IP ranges, then schedules snmp check instances to be run by one or more normal Datadog Agents.
Agent auto-discovery combined with Cluster Agent is very scalable, it can be used to monitor a large number of snmp devices.
Example Cluster Agent setup with SNMP Agent auto-discovery using Datadog helm-chart
First you need to add Datadog Helm repository.
helm repo add datadog https://helm.datadoghq.com
helm repo update
Then run:
helm install datadog-monitoring --set datadog.apiKey=<YOUR_API_KEY> -f cluster-agent-values.yaml datadog/datadog
Example cluster-agent-values.yaml
datadog:
  ## @param apiKey - string - required
  ## Set this to your Datadog API key before the Agent runs.
  ## ref: https://app.datadoghq.com/account/settings/agent/latest?platform=kubernetes
  #
  apiKey: <DATADOG_API_KEY>

  ## @param clusterName - string - optional
  ## Set a unique cluster name to allow scoping hosts and Cluster Checks easily
  ## The name must be unique and must be dot-separated tokens where a token can be up to 40 characters with the following restrictions:
  ## * Lowercase letters, numbers, and hyphens only.
  ## * Must start with a letter.
  ## * Must end with a number or a letter.
  ## Compared to the rules of GKE, dots are allowed whereas they are not allowed on GKE:
  ## https://cloud.google.com/kubernetes-engine/docs/reference/rest/v1beta1/projects.locations.clusters#Cluster.FIELDS.name
  #
  clusterName: my-snmp-cluster

  ## @param clusterChecks - object - required
  ## Enable the Cluster Checks feature on both the cluster-agents and the daemonset
  ## ref: https://docs.datadoghq.com/agent/autodiscovery/clusterchecks/
  ## Autodiscovery via Kube Service annotations is automatically enabled
  #
  clusterChecks:
    enabled: true

  ## @param tags  - list of key:value elements - optional
  ## List of tags to attach to every metric, event and service check collected by this Agent.
  ##
  ## Learn more about tagging: https://docs.datadoghq.com/tagging/
  #
  tags:
    - 'env:test-snmp-cluster-agent'

## @param clusterAgent - object - required
## This is the Datadog Cluster Agent implementation that handles cluster-wide
## metrics more cleanly, separates concerns for better rbac, and implements
## the external metrics API so you can autoscale HPAs based on datadog metrics
## ref: https://docs.datadoghq.com/agent/kubernetes/cluster/
#
clusterAgent:
  ## @param enabled - boolean - required
  ## Set this to true to enable Datadog Cluster Agent
  #
  enabled: true

  ## @param confd - list of objects - optional
  ## Provide additional cluster check configurations
  ## Each key will become a file in /conf.d
  ## ref: https://docs.datadoghq.com/agent/autodiscovery/
  #
  confd:
    # Static checks
    http_check.yaml: |-
      cluster_check: true
      instances:
        - name: 'Check Example Site1'
          url: http://example.net
        - name: 'Check Example Site2'
          url: http://example.net
        - name: 'Check Example Site3'
          url: http://example.net
    # Autodiscovery template needed for `snmp_listener` to create instance configs
    snmp.yaml: |-
      cluster_check: true

      # AD config below is copied from: https://github.com/DataDog/datadog-agent/blob/master/cmd/agent/dist/conf.d/snmp.d/auto_conf.yaml
      ad_identifiers:
        - snmp
      init_config:
      instances:
        -
          ## @param ip_address - string - optional
          ## The IP address of the device to monitor.
          #
          ip_address: "%%host%%"

          ## @param port - integer - optional - default: 161
          ## Default SNMP port.
          #
          port: "%%port%%"

          ## @param snmp_version - integer - optional - default: 2
          ## If you are using SNMP v1 set snmp_version to 1 (required)
          ## If you are using SNMP v3 set snmp_version to 3 (required)
          #
          snmp_version: "%%extra_version%%"

          ## @param timeout - integer - optional - default: 5
          ## Amount of second before timing out.
          #
          timeout: "%%extra_timeout%%"

          ## @param retries - integer - optional - default: 5
          ## Amount of retries before failure.
          #
          retries: "%%extra_retries%%"

          ## @param community_string - string - optional
          ## Only useful for SNMP v1 & v2.
          #
          community_string: "%%extra_community%%"

          ## @param user - string - optional
          ## USERNAME to connect to your SNMP devices.
          #
          user: "%%extra_user%%"

          ## @param authKey - string - optional
          ## Authentication key to use with your Authentication type.
          #
          authKey: "%%extra_auth_key%%"

          ## @param authProtocol - string - optional
          ## Authentication type to use when connecting to your SNMP devices.
          ## It can be one of: MD5, SHA, SHA224, SHA256, SHA384, SHA512.
          ## Default to MD5 when `authKey` is specified.
          #
          authProtocol: "%%extra_auth_protocol%%"

          ## @param privKey - string - optional
          ## Privacy type key to use with your Privacy type.
          #
          privKey: "%%extra_priv_key%%"

          ## @param privProtocol - string - optional
          ## Privacy type to use when connecting to your SNMP devices.
          ## It can be one of: DES, 3DES, AES, AES192, AES256, AES192C, AES256C.
          ## Default to DES when `privKey` is specified.
          #
          privProtocol: "%%extra_priv_protocol%%"

          ## @param context_engine_id - string - optional
          ## ID of your context engine; typically unneeded.
          ## (optional SNMP v3-only parameter)
          #
          context_engine_id: "%%extra_context_engine_id%%"

          ## @param context_name - string - optional
          ## Name of your context (optional SNMP v3-only parameter).
          #
          context_name: "%%extra_context_name%%"

          ## @param tags - list of key:value element - optional
          ## List of tags to attach to every metric, event and service check emitted by this integration.
          ##
          ## Learn more about tagging: https://docs.datadoghq.com/tagging/
          #
          tags:
            # The autodiscovery subnet the device is part of.
            # Used by Agent autodiscovery to pass subnet name.
            - "autodiscovery_subnet:%%extra_autodiscovery_subnet%%"

          ## @param extra_tags - string - optional
          ## Comma separated tags to attach to every metric, event and service check emitted by this integration.
          ## Example:
          ##  extra_tags: "tag1:val1,tag2:val2"
          #
          extra_tags: "%%extra_tags%%"

          ## @param oid_batch_size - integer - optional - default: 60
          ## The number of OIDs handled by each batch. Increasing this number improves performance but
          ## uses more resources.
          #
          oid_batch_size: "%%extra_oid_batch_size%%"

  ## @param datadog-cluster.yaml - object - optional
  ## Specify custom contents for the datadog cluster agent config (datadog-cluster.yaml).
  #
  datadog_cluster_yaml:
    listeners:
      - name: snmp

    # See here for all `snmp_listener` configs: https://github.com/DataDog/datadog-agent/blob/master/pkg/config/config_template.yaml
    snmp_listener:
      workers: 2
      discovery_interval: 10
      configs:
        - network: 192.168.1.16/29
          version: 2
          port: 1161
          community: cisco_icm
        - network: 192.168.1.16/29
          version: 2
          port: 1161
          community: f5
TODO: architecture diagram, example setup, affected files and repos, local testing tools, etc.